⚡ Quick Setup
Follow these steps to connect your courseware to Canvas:
- Add the Follett Willo Digital Delivery tool to your course.
- Pair the courseware with your LMS course.
- Select your publisher and complete the course setup.
Estimated setup time: 2–3 minutes.
🔁 Copying Course to the Next Term? Click HERE.
I. Part One: Adding the Follett Willo Digital Delivery 1.3 Tool
-
Open your course in Canvas and select Modules.
-
Launch the Follett Willo Digital Delivery Tool. In Canvas, this tool may appear in one of two locations.
- Either by clicking the ︙ next to the + Module button and selecting Follett Willo Digital Delivery 1.3 (select 1.1 if you are using Macmillan, WileyPLUS, or Cengage's Spark).
- From a module by clicking + from an added or newly created module, choose External Tool, and select Follett Willo Digital Delivery 1.3 (select 1.1 if you are using Macmillan, WileyPLUS, or Cengage's Spark).
Note: If you do not see the tool listed, use Option C below.
🔹 Option C — Manually add the tool (only if A and B are unavailable)
- Click + → choose External Tool.
- Enter a name (e.g., Course Resources).
- Paste the correct URL:
- USA:
https://app2.willolabs.com/lti/launch/onelink/ - Canada:
https://ca2.willolabs.com/onelink
- USA:
- Check Load in a new tab.
- Click Add Item, then continue to Part Two.
Important: Hide this link from students.
II. Part Two: Pairing the Courseware
-
Click Continue in a new window to open the Follett Willo pairing experience.
-
On the Select Course to Pair screen, choose the correct course and click Pair Course.
If you teach multiple courses, be sure to select the matching section.
Requirement: Pairing must be completed prior to students gaining access to publisher materials.
Missing Course Pairing (use only if your course is not listed)
-
Click Missing Course or Pair My Course Manually.
-
Search for your materials using one of the following methods:
- Search Course or Material: Enter the course code or instructor name.
-
Add a Product Token: Enter the token and click Verify.
Need a token? Contact Faculty Support.
-
Click Confirm, select the correct term, click Continue, then click Initialize Pairing.
III. Part Three: Select Your Publisher
After completing Part One and Part Two, select the publisher used for your course below.
Select your publisher and follow the steps carefully.
Cengage
-
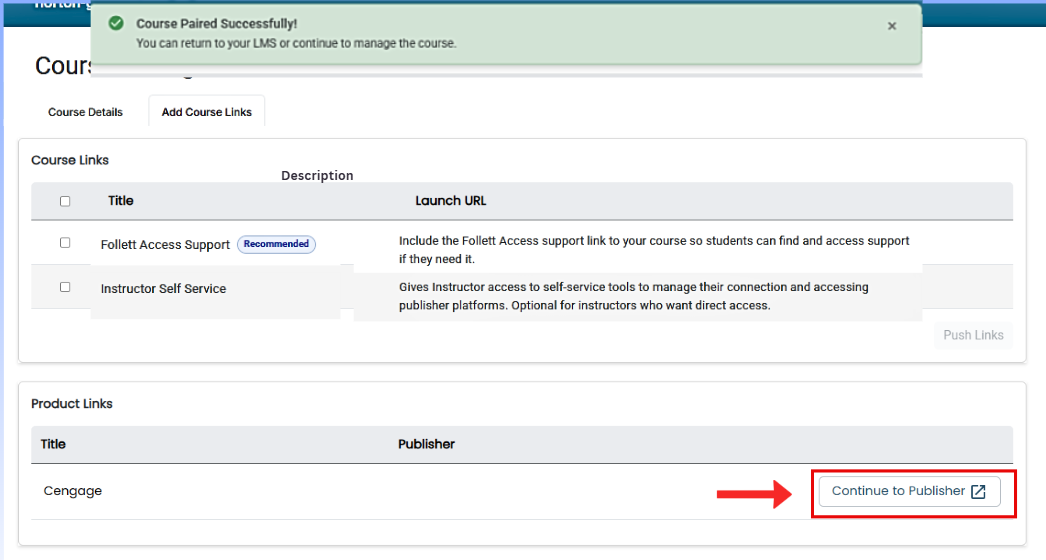
Click Continue to Publisher.
-
Log in to your Cengage Instructor account if prompted.
-
Select your adopted product and click Continue.
- Use the search box to locate the textbook being used for your course. Select your adopted Cengage product.
- Click the radio button for your course text and then select Continue.
-
Select Inclusive Access and click Continue.
Choose how you’d like to set up your course:
- Create a new course
- Copy your existing course (same Cengage product required)
- Copy another instructor’s course using a Course Key (same product required)
- Link to an existing course (only if it has no student enrollments)
Select the option that fits, then click Continue.
- You will see the screen below if you are using MindTap.
Select your preferred option, then click Continue.
- Confirm new course details and click Finish.
- Select Add Course Link to complete the pairing:
- Navigate back to your LMS course and click on the Cengage Course Link added.
- Required: This step is necessary to ensure student access.
Adding Cengage Activity Links to Your LMS Course:
These steps show how to add individual assignment or chapter links that take students directly into specific sections of your Cengage course.
To add Cengage Activity or Additional Content Links, Launch the Follett Willo Digital Delivery 1.3 tool again and click Continue to Publisher to launch your Cengage dashboard.
Click the︙(More Options) menu to the right of the + Module button
Select Follett Willo Digital Delivery 1.3.
- Click Open in a new window if prompted.
- Click Continue to Publisher to launch your Cengage dashboard.
- Click SELECT CONTENT to view available items.
- Check the boxes for the eBook chapters or activities you’d like to add, then click Continue.
- Note: Some activities support grade sync. Check "Add to Gradebook" box to automatically create graded columns in your LMS course.
-
When you see Link Selection Complete, your activity links have been added. Click Close window to return to your LMS.
Adding the Follett Access Course Support Link to Your Course
Add a direct support link to your LMS course for access or pairing issues.
Click the ︙ (More Options) menu next to the + Module button.
-
Select Follett Willo Digital Delivery 1.3.
-
On the Add Course Links screen, select Follett Access Course Support, then click Add Links.
- Use the Follett Access Course Support link to contact support about access or pairing issues.
- The optional Instructor Self-Service link should be hidden from students.
✔ Setup Complete.
💡Important
- Before finishing, confirm that all links are published and visible to students in your LMS.
Students must access course materials through the publisher links in your LMS to ensure proper access and grade synchronization. Direct access through the publisher’s website may cause issues.
For additional guidance, refer students to:
👉 Students: Accessing Your Digital Course Materials with Willo
💬Additional Support
- If you have any questions or would like further assistance, please Contact Faculty Support , or reach out to your Cengage Publisher Representative .
- For more information, check out Cengage’s Instructor Guide HERE .
Great River Learning
Great River Learning Setup
- Select Continue to Publisher on the right to proceed to Great River Learning.
Note: We will revisit this page later in the process to add the Follett Access Support link(s).
- You will now be redirected to your Great River Learning instructor account.
- If prompted, log in and choose the appropriate course section by selecting Select next to the course name, then click Confirm.
- Next, choose the gradebook you wish to associate with your LMS (as shown below).
- Select content to deep link, then click Submit.
- Click Close window and navigate back to your Canvas course.
- The link(s) will now appear in the designated Content area. Click the Great River Learning link added to initialize the course pairing.
Adding the Follett Access Course Support link.
Add the Follett Access Course Support by launching the Follett Willo digital delivery 1.3 tool again:
Click the ︙ (More Options) menu to the right of the + Module button.
Select Follett Willo Digital Delivery 1.3.
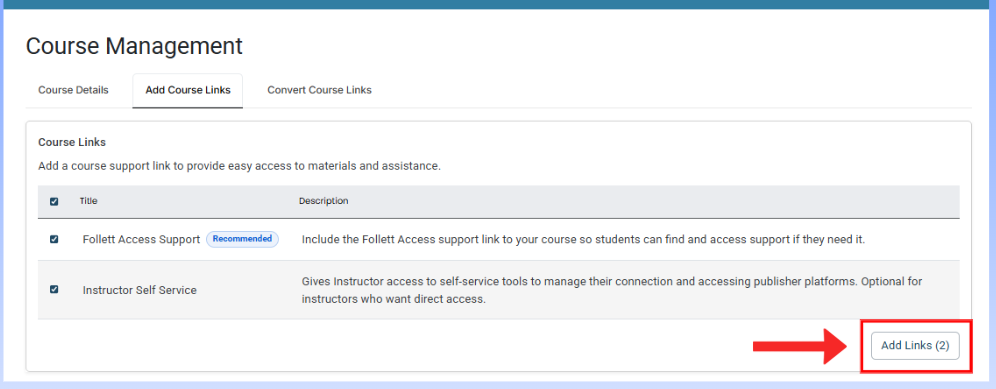
From the Add Course Links screen, check the Follett Access Course Support link link(s), then click Add Links.
- The Follett Access Support link offers instructors and students direct help for access issues.
- The Instructor Self-Service is optional and for instructor use only as it routes back to the Course Management page shown below.
- Note: Hide Instructor Self-Service from students. It’s for instructor use only and routes back to this Course Management page.
Grade Sync
Grade sync is supported for Great River Learning and does not require any additional setup beyond returning the deep links to the LMS.
Troubleshooting Common Errors
If the following message appears, the incorrect option may have been selected during the course pairing process. In this case, contact your Great River Learning representative for assistance.
This LMS Course Has Not Been Paired Yet
✔ Setup Complete.
• • •
💡Important
- Before finishing, confirm that all links are published and visible to students in your LMS.
Students must access course materials through the publisher links in your LMS to ensure proper access and grade synchronization. Direct access through the publisher’s website may cause issues.
For additional guidance, refer students to:
👉 Students: Accessing Your Digital Course Materials with Willo
💬Additional Support
- If you have any questions or would like further assistance, please Contact Faculty Support, or reach out to your Publisher Representative .
- For more information, consult your publisher’s instructor resources or training center.
Jones & Bartlett Learning
- Click Continue to Publisher.
- Select resource and import.
-
Launch the JBL link in Canvas by clicking on one of the JBL links added.
Adding the Follett Access Course Support link.
Add the Follett Access Course Support by launching the Follett Willo digital delivery 1.3 tool again:
Click the ︙ (More Options) menu to the right of the + Module button.
Select Follett Willo Digital Delivery 1.3.
From the Add Course Links screen, check the Follett Access Course Support link link(s), then click Add Links.
- The Follett Access Support link offers instructors and students direct help for access issues.
- The Instructor Self-Service is optional and for instructor use only as it routes back to the Course Management page shown below.
-
Note: Hide Instructor Self-Service from students. It’s for instructor use only and routes back to this Course Management page.
-
Note: Hide Instructor Self-Service from students. It’s for instructor use only and routes back to this Course Management page.
✔ Setup Complete.
• • •
💡Important
- Before finishing, confirm that all links are published and visible to students in your LMS.
Students must access course materials through the publisher links in your LMS to ensure proper access and grade synchronization. Direct access through the publisher’s website may cause issues.
For additional guidance, refer students to:
👉 Students: Accessing Your Digital Course Materials with Willo
💬Additional Support
- If you have any questions or would like further assistance, please Contact Faculty Support , or reach out to your Jones & Bartlett Publisher Representative .
- For more information, check out Cengage’s Instructor Guide HERE.
JoVE
- Select Continue to Publisher on the right to proceed to JoVE.
- Note: You’ll revisit this page later to add the Course Support link(s).
💡 If you see the screen shown below, select your JoVe Integration and proceed to step 1.
- Choose a Content Type, such as Videos.
- Note: You can always come back to this screen later and select more videos/content
- Select a Discipline that matches your Course Topic.
- Narrow it down by Selecting a Subject.
- Browse and choose topics within selected subject.
- Click the + buttons next to the videos you want to add (1 or multiple) and then click the Submit button in the bottom right corner to return them to Canvas.
- Next, click Close Window.
- The content links you selected will now appear in the LMS Content Module area. Click one of the JoVE links added to initialize your course pairing and complete the pairing.
- If prompted, select your academic term from the dropdown menu and click Submit.
Grade Sync:
Grade sync is supported for JoVE quizzes and does not require any additional setup beyond returning the quizz links to Canvas. All quizzes are scored and will sync as a percentage.
Adding the Follett Access Course Support link.
Add the Follett Access Course Support by launching the Follett Willo digital delivery 1.3 tool again:
Click the ︙ (More Options) menu to the right of the + Module button.
Select Follett Willo Digital Delivery 1.3.
From the Add Course Links screen, check the Follett Access Course Support link link(s), then click Add Links.
- The Follett Access Support link offers instructors and students direct help for access issues.
- The Instructor Self-Service is optional and for instructor use only as it routes back to the Course Management page shown below.
-
Note: Hide Instructor Self-Service from students. It’s for instructor use only and routes back to this Course Management page.
-
Note: Hide Instructor Self-Service from students. It’s for instructor use only and routes back to this Course Management page.
- Click Close Window and return to your Canvas course.
✔ Setup Complete.
• • •
💡Important
- Before finishing, confirm that all links are published and visible to students in your LMS.
Students must access course materials through the publisher links in your LMS to ensure proper access and grade synchronization. Direct access through the publisher’s website may cause issues.
For additional guidance, refer students to:
👉 Students: Accessing Your Digital Course Materials with Willo
💬Additional Support
- If you have any questions or would like further assistance, please Contact Faculty Support, or reach out to your JoVe Publisher Representative.
- For more information, check out JoVe's Instructor Guide HERE.
Macmillan
- Select the Macmillan Tools and Follett Access Support course links and click Push Links.
⚠️ Note:
- The Follett Access Support link is available to both students and faculty and directs to the Follett Access Helpdesk for access issues.
- The Instructor Self Service link is optional (as it returns you to the screen above).
- Select Push directly to LMS and click Submit.
- Click on the Macmillan Tools link added in your Canvas Content Module area.
- Select the Connect with Achieve link at the top of the page to pair your course to your Macmillan content.
- You will be prompted to log in with your Macmillan credentials. This occurs only the first time you access the Achieve courseware.
- Locate your course section.
- Click the green Yellow button to complete pairing.
- If you need assistance creating or copying an Achieve course, contact your Macmillan representative or view this video.
Trouble pairing your course? Click here for guidance
If Your Course Section Does Not Appear
- Open a new browser window
- Log in to your Macmillan instructor account
- Create your course section
- Return to the pairing screen and click Refresh
If Your Course Section Is Grayed Out
This means the course is already linked to your LMS.
- ✔ Paired via Follett Willo (Correct Setup) — No action needed
- ⚠ Paired directly through Macmillan (Incorrect Setup) — Must be fixed
Fix Incorrect Pairing (Required)
- In Canvas, click Macmillan in the left navigation
- Select Unlink Course
Then:
- Go to Settings → Navigation
- Disable the Macmillan tool
- Click Save
Next:
- Delete all existing Macmillan links in:
- Modules
- Assignments
Don’t worry—your content remains in your Macmillan instructor account. This step simply resets the LMS connection.
Re-Add via Willo (Correct Method)
Return to your course and re-add materials using:
Follett Willo Digital Delivery 1.3
- Ensures proper student enrollment
- Maintains billing alignment
- Prevents access issues
- Select the content you wish to display in your course. Use the orange arrows next to each content item to expand selections. Then click Next: Choose Location in the lower right corner.
- Use the drop-down menu at the top center to select the module(s) where the content will be deployed. Then click Deploy Selected Content in the lower right corner.
- Return to the content area in your LMS course where you will find the newly imported Macmillan link(s).
💡Important
- Before finishing, confirm that all links are published and visible to students in your LMS.
Students must access course materials through the publisher links in your LMS to ensure proper access and grade synchronization. Direct access through the publisher’s website may cause issues.
For additional guidance, refer students to:
👉 Students: Accessing Your Digital Course Materials with Willo
✔ Setup Complete.
• • •
💬Additional Support
- If you need assistance or encounter issues during setup Submit a support request to the Follett Implementation Team or Contact your Macmillan Publisher Representative for courseware-specific pairing or content questions.
- Refer to your publisher’s instructor resources or training center for additional documentation and best practices.
Macmillan Bedford Bookshelf Code Reveal
- Select the Follett Access Support and Macmillan Bedford Bookshelf Code Reveal links, then click Push Links.
- Click Close Window and return to your Canvas course to verify that the selected links now appear in your content area.
- The links you selected now appear in your Canvas course. Ensure the Macmillan Bedford Bookshelf Access Code and Follett Access Support links are visible to students so they can launch them and redeem their codes.
What Does A Student See?
Let students know where to access the Access Code link in your Canvas course.
When they it, they may be prompted to select Continue to view their access code and acknowledge the program’s access terms.
Selecting Access My Course Materials directs students to the publisher’s platform, where they can register their code and access the assigned course materials.
💡Important
- Before finishing, confirm that all links are published and visible to students in your LMS.
Students must access course materials through the publisher links in your LMS to ensure proper access and grade synchronization. Direct access through the publisher’s website may cause issues.
For additional guidance, refer students to:
👉 Students: Accessing Your Digital Course Materials with Willo
✔ Setup Complete.
• • •
💬 Additional Support:
- If you need assistance or encounter issues during setup Submit a support request to the Follett Implementation Team or Contact your Macmillan Publisher Representative for courseware-specific pairing or content questions.
- Refer to your publisher’s instructor resources or training center for additional documentation and best practices.
Packback
- You’re now ready to add links to your course. Select Course Support, Instructor Self Service, and Packback (Publisher) and then click Add Links.
- Click Close window and navigate to your LMS course.
- Return to your LMS course Module/Content area and click on the Packback link added.
- Click Continue in a new window to proceed.
- Select I Have An Account and log in using your Packback credentials. If you don't have an account, select I've Never Used Packback and proceed from there.
- Locate the Packback Community you created, then click Connect.
💡Important
- Before finishing, confirm that all links are published and visible to students in your LMS.
Students must access course materials through the publisher links in your LMS to ensure proper access and grade synchronization. Direct access through the publisher’s website may cause issues.
For additional guidance, refer students to:
👉 Students: Accessing Your Digital Course Materials with Willo
✔ Setup Complete.
• • •
💬Additional Support
- If you have any questions or would like further assistance, please Contact Faculty Support, or reach out to your Publisher Representative.
- For more information, check out XXX'S Instructor Guide HERE.
Pearson
- Select Pearson Course Materials and Follett Access Support and click Add Links.
-
Click Close Window, return to your Canvas course, and go to the Module with the links. Then click the Pearson Course Materials link.
- Log in to Pearson. If prompted, select Link Accounts.
-
Choose one of the following:
- Open an existing course
- Create a new course
- Copy an existing course
- If creating a new course, enter course details and confirm.
-
Return to Canvas and click the Pearson Course Materials link again to complete initialization.
Required: Students must access Pearson through the Canvas Module link for pairing and grade sync to function properly.
- Confirm:
- The Content Module is published.
- The Pearson Course Materials link is published.
- “Access Pearson” links (if present) are hidden from students.
💡Important
- Before finishing, confirm that all links are published and visible to students in your LMS.
Students must access course materials through the publisher links in your LMS to ensure proper access and grade synchronization. Direct access through the publisher’s website may cause issues.
For additional guidance, refer students to:
👉 Students: Accessing Your Digital Course Materials with Willo
✔ Setup Complete.
💬 Additional Support:
- If you have any questions or would like further assistance, please Contact Faculty Support, or reach out to your Pearson Representative.
- For more information, consult Pearson's Instructor Resources or schedule a meeting with Pearson Faculty Services.
Sage
In this section, you will complete your Sage Vantage setup and add the selected courseware links to your Canvas course.
- When the Add Course Links screen displays Course Paired Successfully, click Continue to Publisher to proceed to Sage Vantage.
- If you previously created a Sage Vantage course for this term, select it from your dashboard.
If your dashboard shows No active course found, click Go to Vantage.
- To reuse content from a previous term, click the gear icon on a past course and select Copy.
- Update your new course information as prompted, then click Next.
-
Use the filters to select assignments or chapters. Check the Link to Course boxes for:
- Course Dashboard
- Any assignments or resources you want available in Canvas
Click Continue.
- Review the selected assignments and resources. Click Continue to push the links into your Canvas course.
-
After the success message appears, click Close Window. Return to your Canvas module to confirm that your Sage links are visible.
Return to your Canvas course content module and click the Sage Vantage link added.
⚠️ Required: Clicking this link completes the pairing process and ensures student access.
- To Add the recommendedFollett Access Support and the optionalInstructor Self-Service links Navigate back to your Canvas course and complete the following steps outlined in Part One:
Select Books & Tools → Browse all course tools (if necessary) → select Follett Willo Digital Delivery 1.3.
-
From the Add Course Links screen, check the link(s), then click Add Links.
Follett Access Support link is recommended as it offers instructors and students direct help for access issues.
-
The Instructor Self-Service is for instructor use only and routes back to the Course Management page shown below.
Note: Hide Instructor Self-Service from students. It’s for instructor use only and routes back to this Course Management page.
✔ Setup Complete.
• • •
💡Important
- Before finishing, confirm that all links are published and visible to students in your LMS.
Students must access course materials through the publisher links in your LMS to ensure proper access and grade synchronization. Direct access through the publisher’s website may cause issues.
For additional guidance, refer students to:
👉 Students: Accessing Your Digital Course Materials with Willo
✔ Setup Complete.
• • •
💬 Additional Support:
- Submit a support request to the Follett Willo Support Team.
- Contact your Sage Publisher Representative .
- Review Sage instructor training resources for course-specific guidance.
Top Hat
- Add the publisher and support link, check the boxes next to Follett Access Support and the Top Hat link. Then click Add Links.
-
Click Close Window, return to your Canvas course, then click the Top Hat link to complete pairing.
-
You will now be launched to the publisher’s website. Create a new account or log in with your existing Top Hat account.
-
Select a course to connect. If you do not see a course listed, contact your Top Hat publisher representative.
-
Once connected, direct students to use the Top Hat link placed in Canvas to access materials.
✔ Setup Complete.
• • •
💡Important
- Before finishing, confirm that all links are published and visible to students in your LMS.
Students must access course materials through the publisher links in your LMS to ensure proper access and grade synchronization. Direct access through the publisher’s website may cause issues.
For additional guidance, refer students to:
👉 Students: Accessing Your Digital Course Materials with Willo
Additional Support
VHL: Vista Higher Learning
-
Select Continue to Publisher to proceed to Vista Higher Learning.
-
Log in using your VHL instructor credentials.
-
On the Course Connector page, select the VHL course section and click LINK THIS SECTION.
Note: If the section you need isn’t available, open the VHLCentral website in a new browser window, create your course section, then return here and click Refresh. - Select your preferred link type:
- LINK TO VHLCENTRAL HOME – adds a link to the student dashboard.
- LINK TO SPECIFIC ACTIVITY or ASSESSMENT – adds a link to a specific activity or assessment.
- LINK TO CURRENT ASSIGNMENTS – adds a link to current assignments.
Return to your Canvas course content module and click the VHL Course Materials link.
⚠️ Required: Clicking this link completes the pairing process and ensures student access.
Return to your Canvas course to add the recommended Follett Access Support and optional Instructor Self-Service links by completing the steps outlined in Part One:
➡️ Select Books & Tools
➡️ Select Browse all course tools (if needed)
➡️ Select Follett Willo Digital Delivery 1.3.
-
From the Add Course Links screen, check the link(s), then click Add Links.
Follett Access Support link is recommended as it offers instructors and students direct help for access issues.
The Instructor Self-Service is for instructor use only and routes back to the Course Management page shown below.
Grade Sync:
Vista Higher Learning supports grade sync.
VHL grade sync functionality only attempts to create grade columns and push grades to the LMS after an assignment’s due date has passed.
Students in the course must also link their LMS and VHL accounts for their grades to sync. Follow the steps below to configure assignments for sync.
- Access the Gradebook in the VHL course, and select LMS Sync.
- Select Edit Settings.
- Update Grade Sync Status to Enabled, choose which grade data to sync, and then click SAVE.
✔ Setup Complete.
• • •
💡Important
- Before finishing, confirm that all links are published and visible to students in your LMS.
Students must access course materials through the publisher links in your LMS to ensure proper access and grade synchronization. Direct access through the publisher’s website may cause issues.
For additional guidance, refer students to:
👉 Students: Accessing Your Digital Course Materials with Willo
Additional Support
- If you have any questions or would like further assistance, please Contact Faculty Support, or reach out to your Vista Higher Learning Publisher Representative.
-
For more information, check out VHL's Instructor Guide HERE.
W.W. Norton 1.3
Step 1. Click Continue to Publisher to launch Norton.
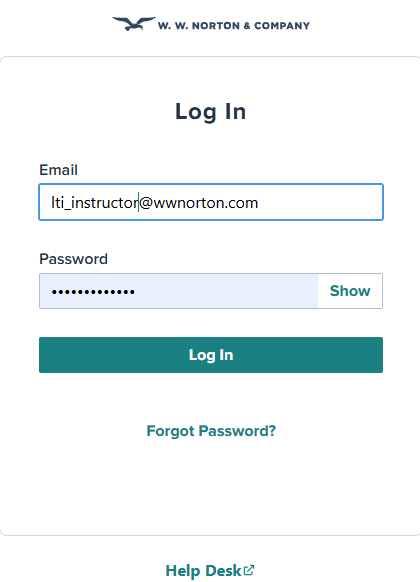
Step 2. Log in to your W.W. Norton Instructor Account (first time only).
Steps 3–6. Confirm LMS connection, verify course materials, enter course details, and confirm course information.
Choose Your Style of Integration:
- A. Individual Assignment Links — Creates separate grade columns for each assignment.
- B. Product Homepage Links — Creates one cumulative grade column per product.
Steps 4–7. Select Norton content links, review selections, send to Canvas, and close the window to return to your course.
Your Norton courseware links are now paired with your LMS course.
Grade Sync
- Grade sync is supported for Norton content.
- No additional configuration is required beyond returning deep links to the LMS.
- Grade columns are created automatically when LMS Grade Column is toggled On.
- Individual assignment links create separate grade columns.
- Homepage links create a cumulative grade column per product.
Troubleshooting
- Incorrect LTI Version Used: Remove the link and re-add using the correct LTI version.
- Course Not Paired Message: Launch the Norton link again to complete pairing.
- Login Loop: Clear browser cache or use a private/incognito window.
- Missing Grade Columns: Confirm LMS Grade Column was toggled ON during deployment.
✔ Setup Complete.
• • •
💡Important
- Before finishing, confirm that all links are published and visible to students in your LMS.
Students must access course materials through the publisher links in your LMS to ensure proper access and grade synchronization. Direct access through the publisher’s website may cause issues.
-
For additional guidance, refer students to:
👉 Students: Accessing Your Digital Course Materials with Willo
Additional Support:
- If you have any questions or would like further assistance, please Contact Faculty Support, or reach out to your W.W. Norton Publisher Representative.
W.W. Norton 1.1
Step 1. Add the Instructor Self-Service link and select Add Link(s).
Steps 2–3. Push links directly to the LMS, then add the Norton and Follett Access Support links.
Steps 4–8. Initialize pairing, log in, create a student set, enter course details, and confirm LMS connection.
Your Norton course material links are now paired with your Canvas course.
Grade Sync
- Grade sync is supported for Norton content.
- No additional configuration is required beyond returning deep links to the LMS.
- Grade columns are created automatically when LMS Grade Column is toggled On.
Troubleshooting
- Incorrect LTI Version Used: Remove the link and re-add using the correct LTI version (1.1).
- Course Not Paired Message: Launch the Norton link again to complete pairing.
- Login Loop: Clear browser cache or use a private window.
- Missing Links: Confirm links were pushed from Instructor Self-Service.
✔ Setup Complete.
• • •
💡Important
- Before finishing, confirm that all links are published and visible to students in your LMS.
Students must access course materials through the publisher links in your LMS to ensure proper access and grade synchronization. Direct access through the publisher’s website may cause issues.
-
For additional guidance, refer students to:
👉 Students: Accessing Your Digital Course Materials with Willo
Additional Support:
- If you have any questions or would like further assistance, please Contact Faculty Support, or reach out to your W.W. Norton Publisher Representative.
WileyPLUS 1.1
-
Select WileyPLUS Course Resources and any additional links desired and click Push Links.
- Return to your LMS course module and click the WileyPLUS Course Resources link added to finalize the pairing.
-
Required: Clicking this link completes the final setup step—activating your paired courseware and enabling student access.
-
Required: Clicking this link completes the final setup step—activating your paired courseware and enabling student access.
- Enter the Integration Code provided by your WileyPLUS representative in an email from noreply@wileyplus.com.
- Copy the Integration Code from the email
- Paste it into the “Enter Integration Code” field (as shown below)
-
Click “Pair Course” to finalize setup.
-
Don’t have the email? No problem—pull it directly from WileyPLUS:
- Open a new browser tab
- Log in to your WileyPLUS instructor account
- Navigate to the course you want to pair
- Locate and copy the Integration Code from the course details
Once entered, the Integration Code will successfully pair your WileyPLUS course with your LMS course and enable student access.
- Select the course you wish to connect to and click Confirm.
✔ Setup Complete.
• • •
Adding WileyPLUS Assignments and Resource Links
WileyPLUS course resources and assignments can be deep-linked in two ways: through the Instructor Self-Service link or through the Wiley Resources link.
- Click the Instructor Self-Service or WileyPLUS Resources link in Canvas.
- Select Add Publisher Links.
- Click Continue to Wiley content and follow the Wiley prompts to bring assignment and resource links back into your LMS.
✔ Setup Complete.
• • •
💡Important
- Before finishing, confirm that all links are published and visible to students in your LMS.
Students must access course materials through the publisher links in your LMS to ensure proper access and grade synchronization. Direct access through the publisher’s website may cause issues.
-
For additional guidance, refer students to:
👉 Students: Accessing Your Digital Course Materials with Willo
Additional Support:
- If you have any questions or would like further assistance, please Contact Faculty Support, or reach out to your Wiley Publisher's Representative. For more information, consult your publisher’s instructor resources or training center.
Willo Reader
In this section, you will add and verify your Willo Reader course materials within your Canvas course.
- When the Add Course Links screen displays Course Paired Successfully, check the box for Willo Reader and Follett Access Support, then click Add Links.
- Click Close Window and return to your Canvas Modules.
- Select the Willo Reader link that was added to initialize the content.
- Required: Launching the Willo Reader link completes setup and enables student access.
- Confirm the eBook loads correctly and that navigation, chapters, and embedded resources appear as expected.
- Verify all links are published and visible to students.
✔ Setup Complete.
• • •
💬 Additional Support:
- Submit a support request to the Follett Willo Support Team.
- Contact your Follett Access Success Leader for course-specific assistance.
Yellowdig
In this section, you will add and verify your Yellowdig course community within your Canvas course.
-
When the Add Course Links screen displays Course Paired Successfully, check the box for Yellowdig (and Follett Access Support, if applicable), then click Add Links.
- Click Close Window and return to your Canvas Modules.
- Click the Yellowdig link added to your Canvas Content module to initialize the pairing.
- Required: Launching the Yellowdig link completes setup and ensures student access. Note: If links don’t appear where expected, check item visibility/publishing or the content area you pushed them to.
If prompted, click Load in a new window.
- You will now be launched to the publisher's website. Enter your instructor login credentials to link your publisher account.
- Note: If your institution uses SSO (Single Sign-On), you may be redirected to your campus sign-in page before completing setup.
- Next, you will be asked to create a New Community for your course if you have not already done so.
✔ Setup Complete.
• • •
💡Important
- Before finishing, confirm that all links are published and visible to students in your LMS.
Students must access course materials through the publisher links in your LMS to ensure proper access and grade synchronization. Direct access through the publisher’s website may cause issues.
-
For additional guidance, refer students to:
👉 Students: Accessing Your Digital Course Materials with Willo
Additional Support:
- If you have any questions or would like further assistance, please Contact Faculty Support, or reach out to your Yellowdig
Access Code Reveal
In this section, you will add and verify the Access Code Reveal link in your Canvas course to allow students to retrieve their publisher access codes.
- When the Add Course Links screen displays Course Paired Successfully, check the box for Access Code Reveal link and the recommended Follett Access Support link and then click Add/Push Links.
- Click Close Window and return to your Canvas course to verify that the selected links now appear in your content area.
- The links you selected now appear in your Canvas course. Ensure the Access Code and Follett Access Support links are visible to students so they can launch them and redeem their codes.
What Does A Student See?
Let students know where to access the Access Code link in your Canvas course.
When they click on it, they may be prompted to select Continue to view their access code and acknowledge the program’s access terms.
Selecting Access My Course Materials directs students to the publisher’s platform, where they can register their code and access the assigned course materials.
✔ Setup Complete.
• • •
💬 Additional Support:
- If you have any questions or would like further assistance, please Contact Faculty Support.
Click HERE to navigate back to the Follett Willo Faculty Resource Hub.
Canvas — Willo Pairing Video Guide